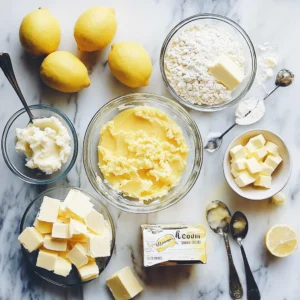
There’s something magical about the recipes that transport us back to our childhood kitchens. For me, it’s the sweet-tart aroma of my grandmother’s lemon desserts wafting through her sunny kitchen on Sunday afternoons. Last week, caught in the whirlwind of deadlines and commitments, I found myself craving that comforting combination of tangy lemon and creamy sweetness. That’s when this Lemon Cream Cheese Dump Cake was born – a simplified tribute to those cherished memories.

Why This Recipe Will Become Your Go-To Dessert:
Life gets busy, but that shouldn’t mean sacrificing delicious, homemade desserts. This dump cake is the answer to your dessert prayers, combining the ease of a dump cake with the sophisticated flavors of a traditional lemon cream cheese pastry. The best part? There’s no mixing required – just layer and bake!
What Makes This Recipe Special
- Preparation takes less than 10 minutes
- Uses simple, readily available ingredients
- Creates impressive results with minimal effort
- Perfect balance of tangy and sweet flavors
- Ideal for both casual family dinners and special occasions
Ingredients:
The Foundation
- 2 (21 oz) cans lemon pie filling
- 1 (15.25 oz) box yellow cake mix
- 8 oz cream cheese, cold and cubed
- 1 cup (2 sticks) unsalted butter, thinly sliced

Why These Ingredients Work Together
- Lemon Pie Filling: Creates a bright, citrusy base that bubbles up through the cake during baking, infusing every bite with tangy sweetness
- Yellow Cake Mix: Forms a golden, buttery crust while seeping into the filling for the perfect cake-meets-pudding texture
- Cream Cheese: Melts into pockets of creamy richness, balancing the tartness of the lemon
- Butter: Transforms the dry cake mix into a crispy, golden topping
Step-by-Step Instruction:
Preparation (5 minutes)
- Preheat your oven to 350°F (175°C)
- Lightly grease a 9×13-inch baking dish
- Cut your cream cheese into ½-inch cubes (pro tip: use dental floss for clean cuts!)
- Slice your cold butter as thinly as possible
Assembly (5 minutes)
- Layer 1 – The Lemon Base
- Spread both cans of lemon pie filling evenly across the bottom of your prepared dish
- Use a spatula to ensure even distribution
- Layer 2 – The Cake Mix
- Sprinkle the entire box of dry cake mix evenly over the lemon filling
- Don’t press down – let it sit naturally on top
- Layer 3 – Cream Cheese
- Distribute the cream cheese cubes evenly across the surface
- Aim for about 1-inch spacing between pieces
- Layer 4 – Butter
- Arrange butter slices to cover as much of the surface as possible
- This ensures even browning and prevents dry spots
Baking (30-35 minutes)
- Place the baking dish in the center rack of your preheated oven
- Bake for 30-35 minutes, or until you see:
- Golden brown top
- Bubbly lemon filling around the edges
- Melted cream cheese turning slightly golden
Cooling
- Allow to cool for 20 minutes before serving
- The filling will thicken slightly as it cools
Pro Tips for the Perfect Dump Cake:
- Temperature Matters
- Use cold cream cheese and butter for easier cutting
- Let the cake cool slightly before serving to achieve the perfect consistency
- Even Distribution is Key
- Take time to spread each layer evenly
- Cover the entire surface with butter slices to prevent dry spots
- Customization Options
- Add 1 teaspoon of lemon zest for extra citrus punch
- Sprinkle sliced almonds on top for added crunch
- Try different pie filling flavors for variety
Serving Suggestions:
Perfect Pairings
- Vanilla ice cream
- Fresh whipped cream
- Fresh berries
- Hot cup of tea or coffee
Presentation Ideas
- Dust with powdered sugar before serving
- Add a mint leaf garnish
- Serve in vintage dessert bowls for nostalgic charm
Storage and Reheating:
Storage Options
- Cover tightly with foil or transfer to an airtight container
- Refrigerate for up to 3 days
- Not recommended for freezing due to cream cheese content
Reheating Tips
- Individual portions: Microwave for 20-30 seconds
- Whole cake: Cover with foil and warm in 300°F oven for 15 minutes
Common Questions Answered:
Q: Can I use low-fat cream cheese?
A: While possible, full-fat cream cheese provides the best texture and flavor.
Q: Why is it called a dump cake?
A: Because you simply “dump” the ingredients in layers – no mixing required!
Q: Can I make this ahead of time? A: Yes! Prepare up to 24 hours in advance and bake when needed.
Looking for More Easy Desserts?
Remember, the beauty of this Lemon Cream Cheese Dump Cake lies in its simplicity. Don’t overthink it – trust the process and enjoy the delicious results. It’s the perfect recipe for busy days when you need a little taste of comfort and nostalgia.

Lemon Cream Cheese Dump Cake
Notes
Ingredients:
The Foundation
-
- 2 (21 oz) cans lemon pie filling
- 1 (15.25 oz) box yellow cake mix
- 8 oz cream cheese, cold and cubed
- 1 cup (2 sticks) unsalted butter, thinly sliced
Instruction:
Preparation (5 minutes)
-
- Preheat your oven to 350°F (175°C)
-
- Lightly grease a 9x13-inch baking dish
-
- Cut your cream cheese into ½-inch cubes (pro tip: use dental floss for clean cuts!)
-
- Slice your cold butter as thinly as possible
Assembly (5 minutes)
-
- Layer 1 - The Lemon Base
-
- Spread both cans of lemon pie filling evenly across the bottom of your prepared dish
-
- Use a spatula to ensure even distribution
-
- Layer 1 - The Lemon Base
-
- Layer 2 - The Cake Mix
-
- Sprinkle the entire box of dry cake mix evenly over the lemon filling
-
- Don't press down – let it sit naturally on top
-
- Layer 2 - The Cake Mix
-
- Layer 3 - Cream Cheese
-
- Distribute the cream cheese cubes evenly across the surface
-
- Aim for about 1-inch spacing between pieces
-
- Layer 3 - Cream Cheese
-
- Layer 4 - Butter
-
- Arrange butter slices to cover as much of the surface as possible
-
- This ensures even browning and prevents dry spots
-
- Layer 4 - Butter
Baking (30-35 minutes)
-
- Place the baking dish in the center rack of your preheated oven
-
- Bake for 30-35 minutes, or until you see:
-
- Golden brown top
-
- Bubbly lemon filling around the edges
-
- Melted cream cheese turning slightly golden
-
- Bake for 30-35 minutes, or until you see:
Cooling
-
- Allow to cool for 20 minutes before serving
- The filling will thicken slightly as it cools


